
{ Guest Post from Irene}
Hello my friends!!!
This week is a bit messy for me, but at least I do have time to have great blogger friends in my blog. This week I have a new friend Irene that is also a mother, a very talented artist and a new blogger….LaCameraFelice! Her creations??? Just adorable…all of them. Cute paintings for your prince and beautiful unique creations for your princess.
It is my honor to have her with a tutorial post, sharing with us the procedure how to create a beautiful girl painting with beautiful materials in a canvas.
.jpg)
Just enjoy it…it is very interesting.
**********************************************
.jpg)
Materials :
1. Canvas size 18×24 cm
2. Scissors
3. Tracing paper
4. Acrylic yarn for
crafts
crafts
5. Felt
6. Ribbon
7. Thread and needle
8. Button
9. Liquid glue
10. 3 brushes (1 medium,
1 thin & 1 old for the glue)
1 thin & 1 old for the glue)
11. Watercolor pencils
(black, brown, light blue, pink and red)
(black, brown, light blue, pink and red)
1ο step
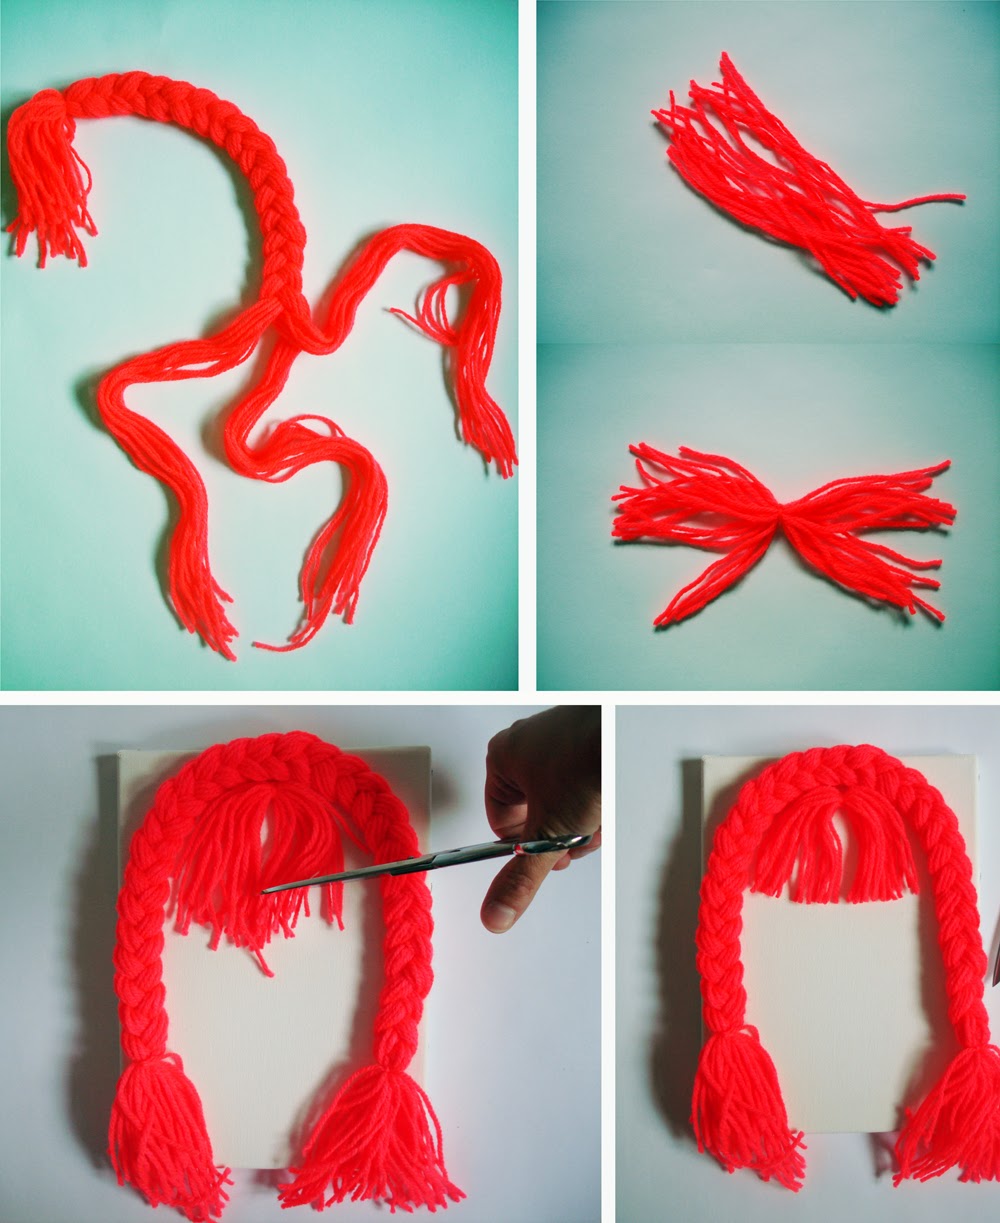
Cut the yarn into 40
strips of 1 meter length. Leave one end 8 cm margin and begin to put together a
braid until you let another 8 cm on the other side. Cut another 20 strips of length 10 cm and tie
them in the middle with yarn. Place the braid on the canvas as if embracing an
imaginary face. Put the other yarn that is tied in the middle as a bang in the
face and trim it with scissors.
2ο step
.jpg)
Take the black or
brown colored pencil and form the face, neck, eyes, the nose and mouth.
brown colored pencil and form the face, neck, eyes, the nose and mouth.
3ο step
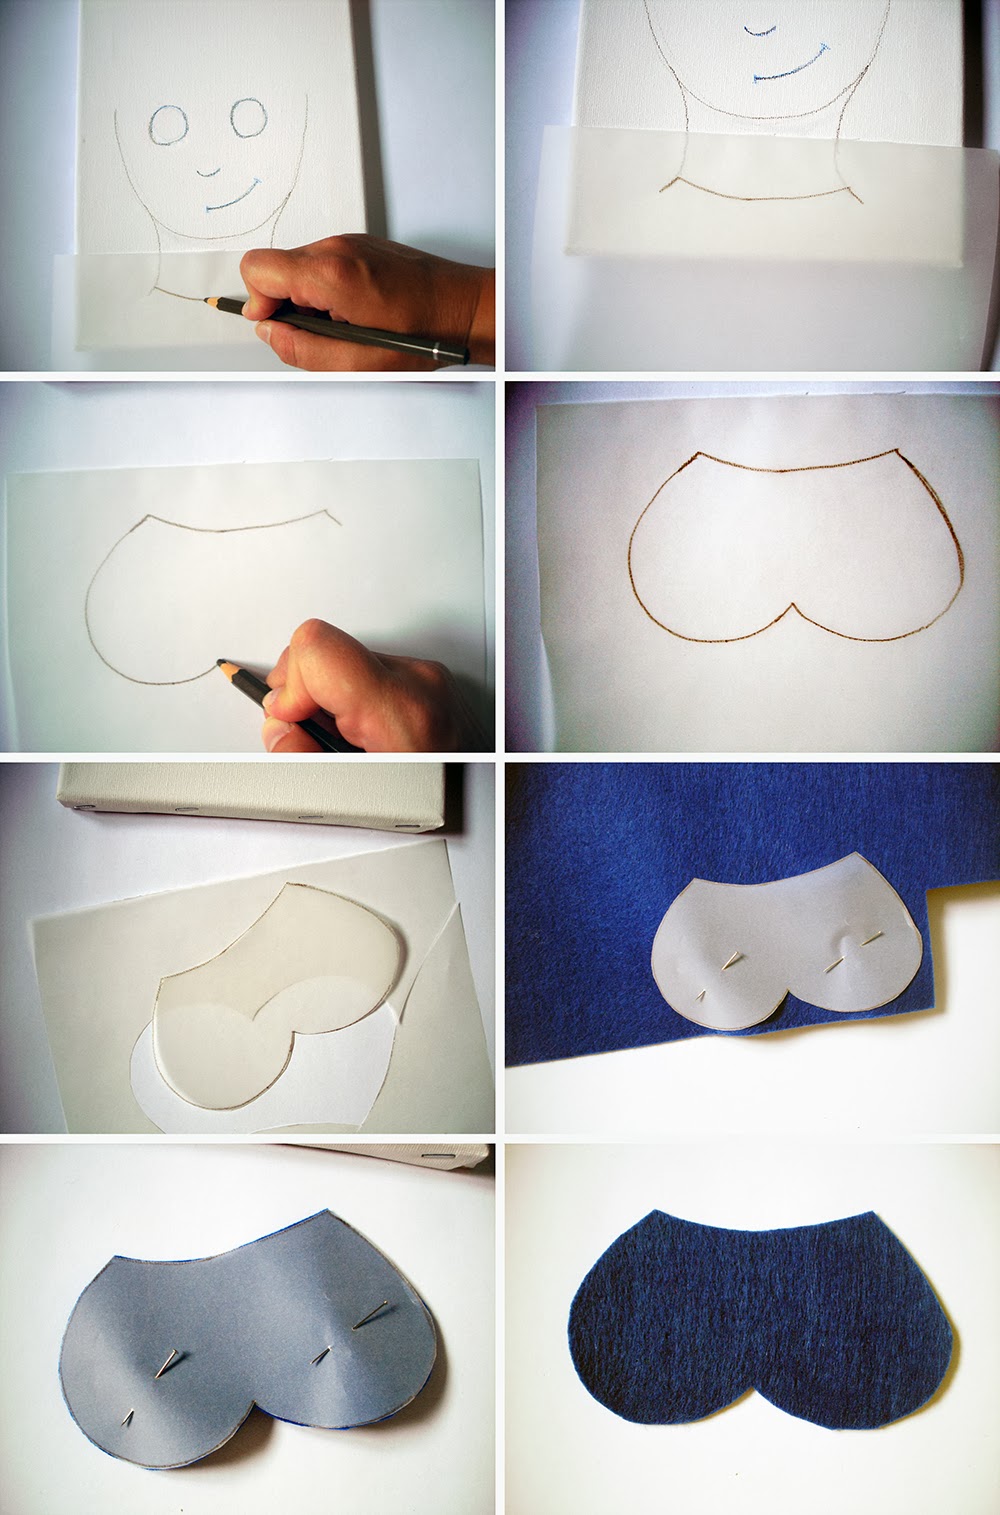
Remove the braid from
the canvas and start making a collar. Place the tracing paper at the surface where
the neck is. Carry a slightly curved line from one side of the neck to the
other. Remove the tracing paper from the canvas and continue with curves to
finish the collar. Cut the pattern of the collar and pin it on the felt. Follow
the pattern and cut the felt.
4ο step
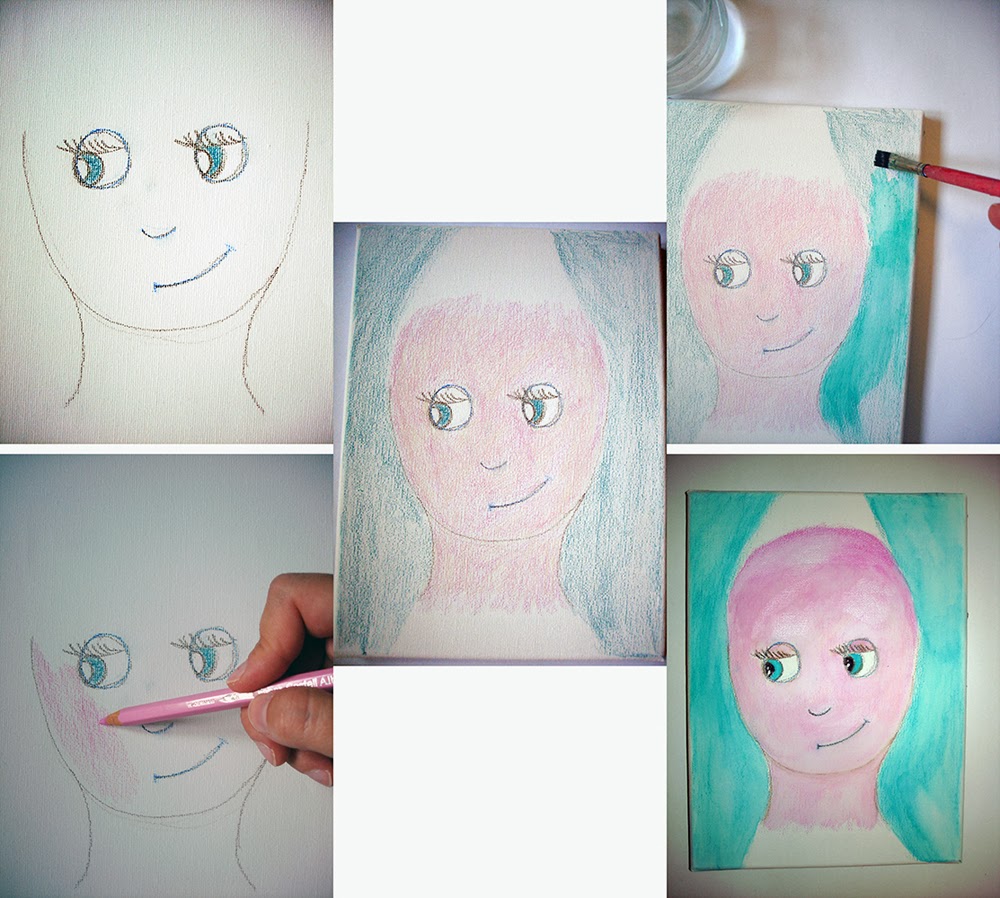
Begin to color the
face with the watercolor pencils. Color the iris blue and the pupil black
leaving two small circles within it white. Make the lashes and paint pink the face
with a blue background (no need to color the surface where you put the braid).
Then dip the middle brush into a cup of water, drain it and pass strokes over
the large surfaces. Repeat that in order to obtain the result of watercolor.
For the eyes use the small brush. No need to pass the brush over the lines
which have formed the eyes, nose, mouth, eyelashes.
5ο step
.jpg)
Sew the button on the
collar and turn it upside down to place the glue, you can also place the glue
on the surface of the canvas or on both surfaces. Glue the collar. Trim the
ends of the braid, tie on a ribbon and place the glue on the back of the braid
and glue it on the canvas. Put glue on the point of the canvas that will glue
the bang and push it a bit to stabilize. Finally with the red pencil put a few
freckles on the girl’s face.

Tips
1.
Instead of
watercolor pencils you can use oil crayons, acrylics or oils
Instead of
watercolor pencils you can use oil crayons, acrylics or oils
2.
Instead of
felt you can use fabric, scrapbooking paper, lace, tulle. The options are many
if there is imagination.
Instead of
felt you can use fabric, scrapbooking paper, lace, tulle. The options are many
if there is imagination.
3.
You can
pass a thin wire in the pigtails to turn.
You can
pass a thin wire in the pigtails to turn.
4.
The collar
can have various shapes.
The collar
can have various shapes.
5.
Do not be
afraid of colors and materials, there are infinite combinations.
Do not be
afraid of colors and materials, there are infinite combinations.
.jpg)
and in Greek….
ΥΛΙΚΑ :
1. Καμβάς διαστάσεων 18×24 cm
2. Ψαλίδι
3. Ριζόχαρτο
4. Μαλλί πλεξίματος ακρυλικό για χειροτεχνία
5. Τσόχα
6. Κορδέλα
7. Κλωστή & βελόνα
8. Κουμπί
9. Ρευστή κόλλα κρυσταλιζέ
10. 3 πινέλα (1 μεσαίου μεγέθους , 1 λεπτό & 1 πρόχειρο για την κόλλα )
11. ξυλομπογιές ακουαρέλας (χρώματα : μαύρο,
καφέ, γαλάζιο, ροζ, κόκκινο)
καφέ, γαλάζιο, ροζ, κόκκινο)
1ο βήμα
Κόβουμε το μαλλί σε περίπου 40 λωρίδες με μήκος 1 μέτρο.
Πιάνοντας τις λωρίδες μαζί, δένουμε τη μία άκρη αφήνοντας 7 εκ. περιθώριο και αρχίζουμε να φτιάχνουμε
μία πλεξούδα ώσπου να αφήσουμε άλλα 7 εκ. στην άλλη άκρη. Κόβουμε άλλες 20
λωρίδες μήκους 10 εκατοστών και αφού τις πιάσουμε ματσάκι τις δένουμε στη μέση
πάλι με μαλλί. Τοποθετούμε την πλεξούδα πάνω στον καμβά σαν να αγκαλιάζουν ένα
νοητό πρόσωπο. Βάζουμε το ματσάκι σαν αφέλειες στο πρόσωπο και τις ψαλιδίζουμε
ώστε να ευθυγραμμιστούν.
2ο βήμα
Παίρνουμε τη μαύρη ή την καφέ ξυλομπογιά και
σχηματίζουμε το πρόσωπο, τον λαιμό , τα μάτια τη, μύτη και το στόμα.
σχηματίζουμε το πρόσωπο, τον λαιμό , τα μάτια τη, μύτη και το στόμα.
3ο βήμα
Αφαιρούμε τα μαλλιά από τον καμβά και πάμε να
φτιάξουμε έναν γιακά. Τοποθετούμε το ριζόχαρτο στο σημείο του λαιμού. Φέρνουμε
με ελαφρά καμπύλη από τη μία άκρη του λαιμού στην άλλη τη γραμμή της
λαιμόκοψης. Βγάζουμε το ριζόχαρτο από τον καμβά και συνεχίζουμε με καμπύλες να
τελειώσουμε τον γιακά. Κόβουμε το πατρόν του γιακά και το καρφιτσώνουμε στην
τσόχα. Τέλος ακολουθώντας το πατρόν κόβουμε την τσόχα.
4ο βήμα
Αρχίζουμε να χρωματίζουμε το πρόσωπο στον
καμβά με τις ξυλομπογιές. Χρωματίζουμε την ίριδα γαλάζια & την κόρη του ματιού μαύρη αφήνοντας 2 μικρούς
κύκλους μέσα σε αυτήν άσπρους. Φτιάχνουμε τις βλεφαρίδες και βάφουμε ροζ το
πρόσωπο και γαλάζιο το φόντο (εκεί που θα τοποθετήσουμε τα μαλλιά δεν
χρειάζεται να το χρωματίσουμε όλο) . Έπειτα βουτάμε το μεσαίο πινέλο μέσα σε
ένα φλιτζάνι με νερό, το στραγγίζουμε και περνάμε τις πιο μεγάλες επιφάνειες.
Επαναλαμβάνουμε ώστε όλος ο καμβάς να αποκτήσει το αποτέλεσμα της ακουαρέλας.
Για τα μάτια χρησιμοποιούμε το μικρό πινέλο. Τις γραμμές όπου έχουμε σχηματίσει
τα μάτια, τη μύτη, το στόμα, τις βλεφαρίδες δεν χρειάζεται να τις περάσουμε με
πινέλο.
5ο βήμα
Ράβουμε το κουμπί στον γιακά και τον
αναποδογυρίζουμε για να βάλουμε την κόλλα με το πρόχειρο πινέλο, μπορούμε
επίσης να βάλουμε μόνο στο σημείο του καμβά που θα μπει ο γιακάς ή και στις δύο
επιφάνειες. Κολλάμε τον γιακά. Ψαλιδίζουμε λίγο τις άκρες στις κοτσίδες, τις
δένουμε μια την κορδέλα και βάζουμε στο πίσω μέρος τους κόλλα και τις κολλάμε
στον καμβά. Βάζουμε κόλλα στο σημείο του καμβά που θα κολλήσουμε τις αφέλειες
και τις πιέζουμε λίγο για να σταθεροποιηθούν.
Τέλος βάζουμε με την κόκκινη ξυλομπογιά λίγες φακίδες στο κοριτσάκι.
Συμβουλές
1.
Αντί για ξυλομπογιά ακουαρέλας
μπορείτε να χρησιμοποιήσετε κηρομπογιές , ακρυλικά χρώματα ή λάδια.
Αντί για ξυλομπογιά ακουαρέλας
μπορείτε να χρησιμοποιήσετε κηρομπογιές , ακρυλικά χρώματα ή λάδια.
2.
Αντί για τσόχα μπορείτε να
χρησιμοποιήσετε ύφασμα, κόλλες για scrapbooking, δαντέλες, τούλια. Οι επιλογές είναι πολλές εάν υπάρχει φαντασία.
Αντί για τσόχα μπορείτε να
χρησιμοποιήσετε ύφασμα, κόλλες για scrapbooking, δαντέλες, τούλια. Οι επιλογές είναι πολλές εάν υπάρχει φαντασία.
3.
Στις κοτσίδες μπορούμε να
περάσουμε και λεπτό σύρμα ώστε να γυρίζουν.
Στις κοτσίδες μπορούμε να
περάσουμε και λεπτό σύρμα ώστε να γυρίζουν.
4.
Ο γιακάς μπορεί να έχει διάφορα
σχήματα.
Ο γιακάς μπορεί να έχει διάφορα
σχήματα.
5.
Μην φοβάστε τα χρώματα και τα
υλικά, μπορεί να γίνουν άπειροι συνδυασμοί.
Μην φοβάστε τα χρώματα και τα
υλικά, μπορεί να γίνουν άπειροι συνδυασμοί.
**********************************************
Amazing isn’t it? Just visit irene’s blog and you will be surprised by her creations….
You will find her in:
Blog : lacamerafelice
Etsy Shop: lacamerafelice
Facebook: lacamerafelice
Pinterest: La Camera Felice
Thank you Irene!!!!
mats mouts


2 Comments
Ζήνα, σ'ευχαριστώ πολύ για την φιλοξενεία!
εγω σε ευχαριστω. τιμη μου!